Primary Camera
7/12/2017
Additional experimentation and research has shed more light and provided some guidance on the imaging issue.
Adding a powered hub does not appear to fix the issue with the newer webcams such as the C615. It seems to add more issues, as having a usb hub hanging off another hub seems to add complexity to lsusb and bus probing etc.
The newer cameras still do not work properly with software on the Pi. They may now show up when ls usb is used but not work properly with the software. Drivers might help with this in the future.
Additional testing has been done with gphoto2. This software allows the Pi to control a digital camera. The software supports many kinds of cameras with different levels of functionality. Cameras are attached via USB interface.
I did testing with my (older used) Nikon L18 and L24 cameras. Both of these worked reasonably well. Using the command line, I was able to take multiple images and save them to the camera sdcard and/or sdcard on the Pi. In addition, the gphoto shell allows for complex operations which might or not be needed for the balloon. Image quality was excellent and the heavy screen was not used at all. This seems like an excellent option for imaging on the balloon. Digital cameras have high quality sensors (up to 20 megapixels or more), which is far beyond the resolution that the simple Pi camera provides. The digital cameras may also provide (depending on model) zoom and other functions that could help to provide higher quality and more scientifically valuable images.
I also tested an older Canon camera with the unofficial Canon hacking development kit available online. I was able to get the software downloaded to an sdcard and activate it on the Canon camera. Very limited testing indicated that this software provided an important increase in functionality to the camera. Untested at this time is whether the software would provide enhanced control by a computer.
Ultimately, partnering with a camera vendor such as Nikon or Canon would likely be necessary for the final balloon payload.
One or two low resolution webcams might still be useful for context or upward looking images but probably would not be suitable for the main imager.
5/30/2017
After several hours of experimentation and testing on the Raspberry Pi 3 with the latest raspbian, I have learned a few things about running multiple cameras on the Pi.
- Cheese, which runs fine on my Toshiba with Linux Mint, does not work well on the Pi. Sometimes it will reboot the computer.
- fswebcam, a command line program, works ok except I cannot see the images before I take them
- The Pi does NOT like some cameras. These include my C615 and C9xx higher end webcams. They work fine on the Toshiba.
- Older webcams seem to work ok. I have a couple of older Logitech ball type cameras that work, and some generic cameras as well.
- The Pi will NOT boot with the unpowered hub and webcams attached. The hub has to be attached later.
- In general, the number of the device in /dev depends on which port on the USB hub the device is on. IE, devices on one port will typically come up as /dev/video0. The next device over will come up as video1, etc.
- Some webcams violate this rule. I do not know why.
- Sometimes running the command lsusb will hang or cause a reboot. If hung, I have to disconnect the hub and reboot the Pi.
- The order of devices shown in lsusb does not seem to correlate to the order in video.
- The numbers for the devices follow the model of manufacturer:product number.
Based on these experiments, it seems like the Pi will require a powered hub for using multiple webcams. I can get three to work most of the time, but even then it will hang up sometimes. The newer and better cameras must need too much power as they will not work at all on the Pi but do work on the Mint machine. I saw a reference to one camera using 120ma. This is a LOT of power, comparable to running another low end Pi. A couple of these cameras plus the keyboard/mouse could exceed the Pi power capacity.
Advantages of using fswebcam are:
- Can specify all parameters for an image on the command line, such as resolution and where to save the file
- Each camera can be different and fswebcam will work with the camera to get a good image
- It actually works and does not lock up the machine
- Multiple webcams can be operated from the Pi, unlike the dedicated camera port
There are a wide variety of powered usb hubs available. I will need to get one to try out running the cameras with the powered hub. In theory, the Pi could control a relay via a transistor or optocoupler, and have the usb hub be powered from a separate circuit. The USB cameras will probably only be on for a minute or two at a time, 4 or 8 times per hour. Some of the hubs have power buttons for each port, which could be handy if they could be automated. The ports could be powered up in sequence or only a single port could be turned on at a time.
5/13/2017
More thinking and testing has gone into the camera part of the mission. Recent expeditions to Mars analog sites have revealed that overhead pictures, even those taken by a good digital camera, are not sufficient for the mission. Depending on balloon altitude and topography, side angle images are also desirable. In an ideal situation, downward pointing as well as angled and side pointing images would be available. As stated below, the Raspberry Pi can only control one of the fancy dedicated cameras and there is no practical way to multiplex two cameras to the unit.
The solution appears to be a hybrid approach. The fancy CSI interface camera would be pointing down towards the ground at all times. Using a USB hub, four web cameras would be attached and pointed in various directions. Under software control, images from these cameras could be captured, saved, and uploaded just as those from the down camera. At this point, the imaging system would consist of 4 webcams, three on sides at various angles and one pointing up towards the balloon/sky. The mass and complexity of steerable cameras is not warranted this time, though on the next mission such a device would be a real plus.
The base hardware would be the Pi Zero (not W, do not need wireless), a USB hub, the CSI camera, and 4 web cameras. Adafruit has just come out with a nifty little USB hub specially designed for the Zero, as shown below:

With this hub, and the CSI/USB devices, it should be possible to make a pretty sophisticated imaging system. Stay tuned for more details.
3/14/2017
After travelling millions of miles to get to Mars, it would be silly not to have a camera on board the balloon payload. There are several factors to consider in this part of the design. First, weight is a critical factor. While it would be nice to have a full blown digital SLR on the flight, the mass of a single good DSLR is about the limit of the entire payload. Lenses are especially massive. A lightweight digital camera could work if it were light enough.
In this case, I will go with one of the below options.
The default Raspberry Pi camera. This unit has a 5 megapixel display and interfaces with the Pi via the CSI interface. This unit has a small fixed focus lens and is very light. There seems to be good library support for this unit and the price is good (around $30.00). The lens appears to be rather weak and does not look to be removable. The new and improved 8 megapixel camera is now out for the Pi for about the same price.
A standard webcam. These are available in a variety of sizes and resolutions. I have several sitting around and have interfaced two of them to the Pi and gotten decent (but not spectacular) results. The lens is not very good, and the resolution tends to be less than 5Mpixel. Higher resolution units do exist, such as the logitech unit shown below. I would just have to strip off all the excess case baggage. This would use up a USB port on the Pi but would offer higher resolution.

On the left in this image is my Pi Camera version 1.0. This devices uses the CSI interface and offers 5mp images. Note the lens is small and fixed focus. On the right in the image is a Logitech C615. This camera has an autofocus lens (which works pretty well) and a max resolution of 1920 x 1080 pixels. Images from the C615 come into focus quickly and can be saved quickly. The C615 has a USB 2.0 interface cable, and is compatible with standard Linux distros like Mint and applications such as Cheese.
The Pi Camera works with the Pi but not any other desktop or embedded device unless they have the special CSI interface. The webcam on the other hand will work with most any system that has a USB port. An ongoing research question is whether the Teensyduino 3.6 can talk to the a webcam using the USB Host port.
In an ideal world, it would be possible to control multiple cameras from a single computer, allowing for different points of view as well as standard, wide angle, and zoom images to be captured. Based on my research, this function is NOT possible with the Pi camera, the alternative here is to have one Pi Zero for each camera. The USB cameras, on the other hand, should be able to do this if they are connected to a USB hub and their power controlled by a simple transistor circuit from the host.
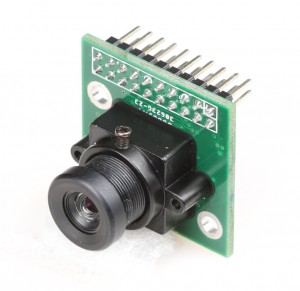
Two alternatives for cameras exist as well. One is the third party device such as : arducam. The resolution of these is about the same as the Pi camera, but with a choice of lenses this could be a win. A second choice is a lightweight digital camera supported by open source camera control software such as gphoto2, wikipedia article on gtkam, etc. I have tested these software packages on Linux and they work well with some cameras. Many high altitude balloon folks use cameras like this and the cameras work well for taking high quality images. Issues with the standard digital camera include mass, ability to control the camera, and how to download the images for uploading to the orbiter. Canon and Nikon seem to be best supported by the third party software.
Below is the arducam. Note the removable lens mount. This adds to mass but allows for replacement with wide angle or possibly telephoto.